Categories
architecture Cloud Foundry cqrs microservices Spring

CQRS and Event Sourcing Microservices on CloudFoundry

I still love the Command and Query Responsibility Segregation (CQRS) and Event Sourcing (ES) architectural patterns, so when the popular Java based Axon Framework went GA with release 3.0 recently, I figured now would be a great time to revisit this topic and update the code from my previous CQRS & Event Sourcing microservices demo.

Source code

The code for this new demo can be found here on GitHub and includes a README with instructions on how to build it and run it for yourself on Pivotal Web Services or PCF-Dev. If you want to compare and contrast with the code for the old demo, it can also be found here on GitHub.

Podcast

There is now an accompanying ‘Pivotal Insights’ podcast available on soundcloud.

Axon Events

We’ll be demonstrating Axon on Pivotal CloudFoundry in a live demo at the AxonIQ conference in Amsterdam on the 29th September 2017 – just one part of a fun-packed day-long CQRS/ES feast-ival. Book your tickets here…

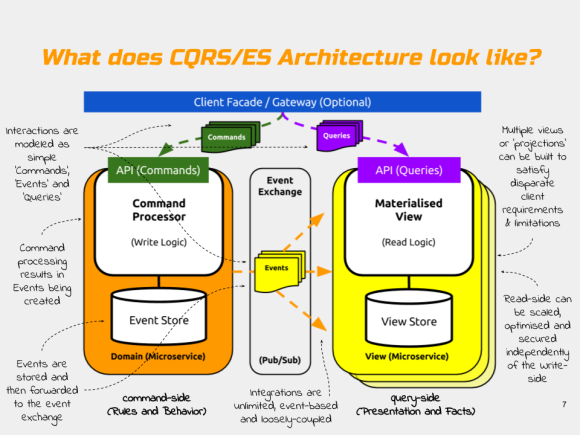
Architectural Overview.

I’m not going to provide any code samples in this article (if you want to you can explore the code for yourself in this GitHub repository). I’m also going to skip any in depth explanations of how CQRS and Event Sourcing work (just take a look at the resources section below if that’s something that you’re interested in exploring further). However, I would like to give you a brief overview of the CQRS architecture used in this particular project.

As you can see in the diagram below, just like last time, this new CQRS project models a simple set of ‘Product Catalog’ API’s. And again, just like last time, the application is physically segregated into two parts: the command-side and the query-side microservices.

CQRS+EventSourcing-on-CloudFoundry
The CQRS architecture. Notice how the microservices communicate using events in order to remain loosely-coupled from one another. Notice also the command-side ‘Event Store’ where the stream of events is persisted.

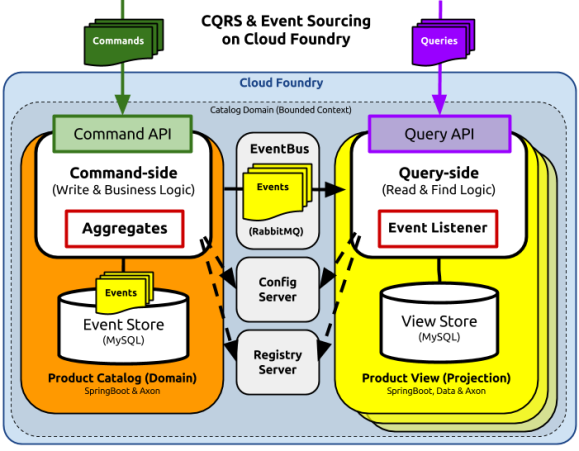
Clients of these microservices can add Products to the catalog using a command (a simple JSON structure) that is POSTed to the command-side REST API (/add). Clients can also query for the products currently in the catalog using a GET request on the query-side REST API (/products).

The command-side and the query-side components live in separate processes; only communicate using events; and never directly with each other. They use a publish/subscribe messaging service to communicate in order to maintain a loose coupling between them.

The commands in the system such as AddProductToCatalog trigger behaviours. The events (such as ProductAdded) are the result of executing those behaviours. The events form the basis of all communication between the microservices and also support the event-sourcing persistence mechanism. The persistence mechanism (called the Event Store) offers the means to reconstruct or ‘source’ the state of an individual Product in the catalog at any time.

It’s worth noting that in this simple demo, there is no mechanism through which you can reliably ‘replay’ the events into the query-side model. To replay events with Axon, you need to attach a Tracking Event Processor to the Event Store. This gives you fine grained control over which messages to replay.

Because we’re using a CQRS, it’s expected that you would ultimately have lots of different query-side apps (such as views, projections, reports and legacy adapters etc.). Each query-side application would be a tightly focussed and self-contained microservice. This helps you to maintain the flexibility of your architecture and prevents your microservices reverting into monoliths as new feature requests come along.

If the API fragmentation that results as a side effect of this pattern is a concern for you, you could always use an API gateway to give the appearance of weaving these separate API’s back together – as a BFF for example.

So What’s New in the Demo Code?

In this new demo, you’ll spot a few of major differences in the project’s code, configuration, and build. From a high level, both the microservice code and it’s deployment into the cloud have been greatly simplified in this new incarnation.

Axon V3 has much better support for Spring Boot.

Previously, integrating Axon with Spring Boot was a bit of a pain. I remember had to dig fairly deeply into the configuration of the framework in order to get it all wired together in a way that was sensible and transparent.

Thankfully, with this new V3 release, Axon now offers first class support for Spring Boot. Axon has become far easier to configure, and has several helpful starter JAR’s and annotations that make the process much simpler.

The CommandGateway, for example, is automatically configured for you with default settings and is added to the Application Context as a Spring Bean at startup. All you have to do to benefit from this is include the axon-spring-boot-starter as a dependency in your build.

Bye Bye Docker!

Another major improvement in this new version is a wholesale move away from Docker towards the Cloud Foundry platform. If you’re new to Cloud Foundry or you haven’t heard of Cloud Foundry before, it’s basically a open-source cloud container orchestrator which provides a rich application platform for cloud-native applications. Cloud Foundry is designed with developers in mind and offers an easy to use CLI interface that abstracts away a great deal of the complexity associated with managing containers in the cloud.

Cloud Foundry offers everything I need to run microservice applications at scale, but without any of the associated operational overheads. Out of the box, CloudFoundry offers self-service provisioning of both application containers and backing services, self-healing, auto-scaling, distributed logging and monitoring and a great many other things. These features improve my development productivity immensely and it means I have far fewer components to configure and manage in production.

Compared to my 2015 demo, now I’m using Cloud Foundry, there’s a lot of ‘stuff‘ that I no longer have to do for myself. For example, in the earlier demo, in order to package up the application to run it in the cloud, I had to create and maintain several Docker images (6 in total for this one logical microservice application group).

But now, because Cloud Foundry comes with a marketplace of application backing services (provisioned using the Open Service Broker API standard that Kubernetes will use), I can instantly provision services like databases and messaging servers using the cf create-service command in the terminal. That’s four Docker images that I no longer have to worry about securing, patching, configuring, building and pushing.

Similarly, Cloud Foundry Buildpacks are a way of automatically bundling up my code into open RunC containers and scheduling them. This means that I can simply “push” my application’s JAR file using the cf push command and Cloud Foundry will take my code and run it in the cloud for me. It’s a really simple mechanism, and it allows me to retire two more of my six Docker images. This deployment workflow can be easily scripted and also makes zero-downtime blue-green deployment strategies a total cinch to implement.

Hello Concourse.

Finally, this time around I’ve also included a sample continuous integration pipeline that can be used to build, unit-test, deploy, smoke-test and integration-test the Product Catalog API. I’m using use the open source Concourse server as the CI server for this.

Concourse-pipeline
The Concourse CI Pipeline for the CQRS Application.

I really like Concourse. It treats ‘pipelines’ as a first class citizen (unlike Jenkins); it’s cloud friendly (unlike Jenkins), it allows you to keep your build configuration with your code (unlike Jenkins), and it integrates nicely with Cloud Foundry.

Wrapping Up.

Axon has come a long way with this release. It’s fair to say there are still some aspects that aren’t quite as intuitive or polished as perhaps they could be (I’m looking at you “Event Processing Groups” and you “documentation“), but the improved integration with SpringBoot is much appreciated. The amount of boilerplate code required to configure Axon has diminished considerably, and it’s still a great framework with which to implement a truly Domain-Driven Design.

As for the move to Cloud Foundry, obviously, I realise that Docker looks great from a CV perspective, but when you have to maintain the security and OS patch levels of hundreds of Docker images in production (and also orchestrate them so that applications can self-heal and auto-scale) the novelty of using Docker images for code packaging soon wears off. Besides, I genuinely like the developer workflow in Cloud Foundry, and when you see how much effort goes into basics like OS hardening on the Cloud Foundry platform, you’re bound to wonder why anyone would contemplate doing this themselves.

I hope you find this project a useful introduction to Java based CQRS on Cloud Foundry, and a viable template for getting you started quickly with Axon v3 and Spring Boot. Feel free to use the comments feature or contact me on social media if you would like to get in touch or ask me questions about it.

Additional Resources: I was inspired to revisit this demo by watching “Bootiful CQRS with Axon” by Josh Long of Pivotal and Allard Buijze of Trifork. The book “The CQRS Journey” from Microsoft is a great resource and the eBook version is completely free to download and read. Domain Driven Design Distilled by Vaughn Vernon isn’t free, but it is very readable and it covers a much broader set of topics and describes CQRS and Event Sourcing in a much wider DDD context. This CQRS article by Martin Fowler is also very popular. Finally, this presentation by Greg Young talks about Event Sourcing on the JVM and mentions Axon.

About the Author

Ben Wilcock works for Pivotal as a Senior Solutions Architect. Ben has a passion for microservices, cloud and mobile applications and helps Pivotal’s Cloud Foundry customers to become more responsive, innovate faster and gain greater returns from their software investments. Ben is a respected technology blogger who’s articles have featured in DZone, Java Code Geeks, InfoQ, Spring Blog and more.


Categories
architecture cqrs java microservices SOA

Microservices with Docker, Spring Boot and Axon CQRS/ES

The pace of change in software architecture has rapidly advanced in the last few years. New approaches like DevOps, Microservices and Containerisation have become hot topics with adoption growing rapidly. In this post, I want to introduce you to a microservice project that I’ve been working on which combines two of the stand out architectural advances of the last few years: command and query responsibility separation (CQRS) and containerisation.

In this first installment, I’m going to show you just how easy it it to distribute and run a  multi-server microservice application using containers.

In order to do this I’ve used Docker to create a suite of containers containing all the microservices required to run the demo. At the time of writing there are seven microservices  in this suite; they are:-


The source code for this demo is available on Github and demonstrates how to implement and integrate several of the features required for ‘cloud native’ Java including:-

  • Microservices with Java and Spring Boot;
  • Build, Ship and Run anywhere using Docker containers;
  • Command and Query Responsibility Separation (CQRS) and Event Sourcing (ES) using the Axon Framework v2, MongoDB and RabbitMQ;
  • Centralised configuration, service registration and API Gateway using Spring Cloud;

How it works

The microservice sample project introduced here revolves around a fictitious `Product` master data application similar to that which you’d find in most retail or manufacturing companies. Products can be added, stored, searched and retrieved from this master  data using a simple RESTful service API. As changes happen, notifications are sent to interested parties using messaging.

The Product Data application is built using the CQRS architectural style. In CQRS commands like `ADD` are physically separated from queries like `VIEW (where id=1)`. Indeed in this particular example the Product domain’s codebase has been quite literally split into two separate components – a command-side microservice and a query-side microservice.

Like most 12 factor apps, each microservices has a single responsibility; features its own datastore; and can be deployed and scaled independently of the other. This is CQRS and microservices in their most literal interpretation. Neither CQRS or microservices have to be implemented in this way, but for the purpose of this demonstration I’ve chosen to create a very clear separation of the read and write concerns.

The logical architecture looks like this:-

CQRS Architecture Overview

Both the command-side and the query-side microservices have been developed using the Spring Boot framework. All communication between the command and query microservices is purely `event-driven`. The events are passed between the microservice components using RabbitMQ messaging. Messaging provides a scalable means of passing events between processes, microservices, legacy systems and other parties in a loosely coupled fashion.

Notice how neither of the services shares it’s database with the other. This is important because of the high degree of autonomy it affords each service, which in turn helps the individual services to scale independently of the others in the system. For more on CQRS architecture, check out my Slideshare on CQRS Microservices which the slide above is taken from.

The high level of autonomy and isolation present in the CQRS architectural patterns presents us with an interesting problem – how should we distribute and run components that are so loosely coupled? In my view, containerisation provides the best mechanism and with Docker being so widely used, it’s format has become the defacto standard for container images, with most popular cloud platforms offering direct support. It’s also very easy to use, which definitely helps.

The Command-side Microservice

Commands are “actions which change state“. The command-side microservice contains all the domain logic and business rules. Commands are used to add new Products, or to change their state. The execution of these commands on a particular Product results in `Events` being generated which are persisted by the Axon framework into MongoDB and propagated out to other processes (as many processes as you like) via RabbitMQ messaging.

In event-sourcing, events are the sole record of state for the system. They are used by the system to describe and re-build the current state of any entity on demand (by replaying it’s past events one at a time until all previous events have been re-applied). This sounds slow, but actually because events are simple, it’s really fast and can be tuned further using rollups called ‘snapshots’.

In Domain Driven Design (DDD) the entity is often referred to as an `Aggregate` or an `AggregateRoot.`

The Query-side Microservice

The query-side microservice acts as an event-listener and a view. It listens for the `Events` being emitted by the command-side and processes them into whatever shape makes the most sense (for example a tabular view).

In this particular example, the query-side simply builds and maintains a ‘materialised view’ or ‘projection’ which holds the latest state of the individual Products (in terms of their id and their description and whether they are saleable or not). The query-side can be replicated many times for scalability and the messages held by the RabbitMQ queues can be made to be durable, so they can even temporarily store messages on behalf of the query-side if it goes down.

The command-side and the query-side both have REST API’s which can be used to access their capabilities.

For more information, see the Axon documentation which describes how Axon brings CQRS and Event Sourcing to your Java apps as well as lots of detail on how it’s configured and used.


Running the Demo

Running the demo code is easy, but you’ll need to have the following software installed on your machine first. For reference I’m using Ubuntu 16.04 as my OS, but I have also tested the app on the new Docker for Windows Beta successfully.

  • Docker (I’m using v1.8.2)
  • Docker-compose (I’m using v1.7.1)

If you have both of these, you can run the demo by following the process outlined below.

If you have either MongoDB or RabbitMQ already, please shut down those services before continuing in order to avoid port clashes.

Step 1: Get the Docker-compose configuration file

In a new empty folder, at the terminal execute the following command to download the latest docker-compose configuration file for this demo.

$ wget https://raw.githubusercontent.com/benwilcock/microservice-sampler/master/docker-compose.yml

Try not to change the file’s name – Docker defaults to looking for a file called ‘docker-compose.yml’. If you do change the name, use the -f switch in the following step.

Step 2: Start the Microservices

Because we’re using docker-compose, starting the microservices is now simply a case of executing the following command.

$ docker-compose up

You’ll see lots of downloading and logging output in the terminal window as the docker images are downloaded and run.

There are seven docker images in total, they are mongodb, rabbitmq, config-service, discovery-service, gateway-service, product-cmd-side, & product-qry-side.

If you want to see which docker instances are running (and also get their local IP address), open a separate terminal window and execute the following command:-

$ docker ps

Once the instances are up and running (this can take some time at first) you can have a look around immediately using your browser. You should be able to access:-

  1. The Rabbit Management Console on port `15672`
  2. The Eureka Discovery Server Console on port `8761`
  3. The Configuration Server mappings on port `8888`
  4. The API Gateway Routes on port ‘8080’

Step 3: Working with Products

So far so good. Now we want to test the addition of products.

In this manual system test we’ll issue an `add` command to the command-side REST API.

When the command-side has processed the command a ‘ProductAddedEvent‘ is raised, stored in MongoDB, and forwarded to the query-side via RabbitMQ. The query-side then processes this event and adds a record for the product to it’s materialised-view (actually a H2 in-memory database for this simple demo). Once the event has been processed we can use the query-side microservice to lookup information regarding the new product that’s been added. As you perform these tasks, you should observe some logging output in the docker-compose terminal window.

Step 3.1: Add A New Product

To perform test this we first need to open a second terminal window from where we can issue some CURL commands without stopping the docker composed instances we have running in the first window.

For the purposes of this test, we’ll add an MP3 product to our product catalogue with the name ‘Everything is Awesome’. To do this we can use the command-side REST API and issue it with a POST request as follows…

$ curl -X POST -v --header "Content-Type: application/json" --header "Accept: */*" "http://localhost:8080/commands/products/add/01?name=Everything%20Is%20Awesome"

If you don’t have ‘CURL’ available to you, you can use your favourite REST API testing tool (e.g. Postman, SoapUI, RESTeasy, etc).

If you’re using the public beta of Docker for Mac or Windows (highly recommended), you will need to swap ‘localhost’ for the IP address shown when you ran docker ps at the terminal window.

You should see something similar to the following response.

* Trying 127.0.0.1...
* Connected to localhost (127.0.0.1) port 8080(#0)
> POST /commands/products/add/01?name=Everything%20Is%20Awesome HTTP/1.1
> Host: localhost:9000
> User-Agent: curl/7.47.0
> Content-Type: application/json
> Accept: */*$ http://localhost:8080/commands/products/01
< HTTP/1.1 201 Created
< Date: Thu, 02 Jun 2016 13:37:07 GMTThis
< X-Application-Context: product-command-side:9000
< Content-Length: 0
< Server: Jetty(9.2.16.v20160414)

The response code should be `HTTP/1.1 201 Created.` This means that the MP3 product “Everything is Awesome” has been added to the command-side event-sourced repository successfully.

Step 3.2: Query for the new Product

Now lets check that we can view the product that we just added. To do this we issue a simple ‘GET’ request.

$ curl http://localhost:8080/queries/products/1

You should see the following output. This shows that the query-side microservice has a record for our newly added MP3 product. The product is listed as non-saleable (saleable = false).

{
  name: "Everything Is Awesome",
  saleable: false,
  _links: {
    self: {
    href: "http://localhost:8080/queries/products/1"
    },
  product: {
    href: "http://localhost:8080/queries/products/1"
    }
  }
}

That’s it! Go ahead and repeat the test to add some more products if you like, just be careful not to try to reuse the same product ID when you POST or you’ll see an error.

If you’re familiar with MongoDB you can inspect the database to see all the events that you’ve created. Similarly if you know your way around the RabbitMQ Management Console you can see the messages as they flow between the command-side and query-side microservices.

About the Author

Ben Wilcock is a freelance Software Architect and Tech Lead with a passion for microservices, cloud and mobile applications. Ben has helped several FTSE 100 companies become more responsive, innovate, and agile. Ben is also a respected technology blogger who’s articles have featured in Java Code Geeks, InfoQ, Android Weekly and more. You can contact him on LinkedIn, Twitter and Github.