Categories
architecture cqrs java microservices SOA

Microservices with Docker, Spring Boot and Axon CQRS/ES

The pace of change in software architecture has rapidly advanced in the last few years. New approaches like DevOps, Microservices and Containerisation have become hot topics with adoption growing rapidly. In this post, I want to introduce you to a microservice project that I’ve been working on which combines two of the stand out architectural advances of the last few years: command and query responsibility separation (CQRS) and containerisation.

In this first installment, I’m going to show you just how easy it it to distribute and run a  multi-server microservice application using containers.

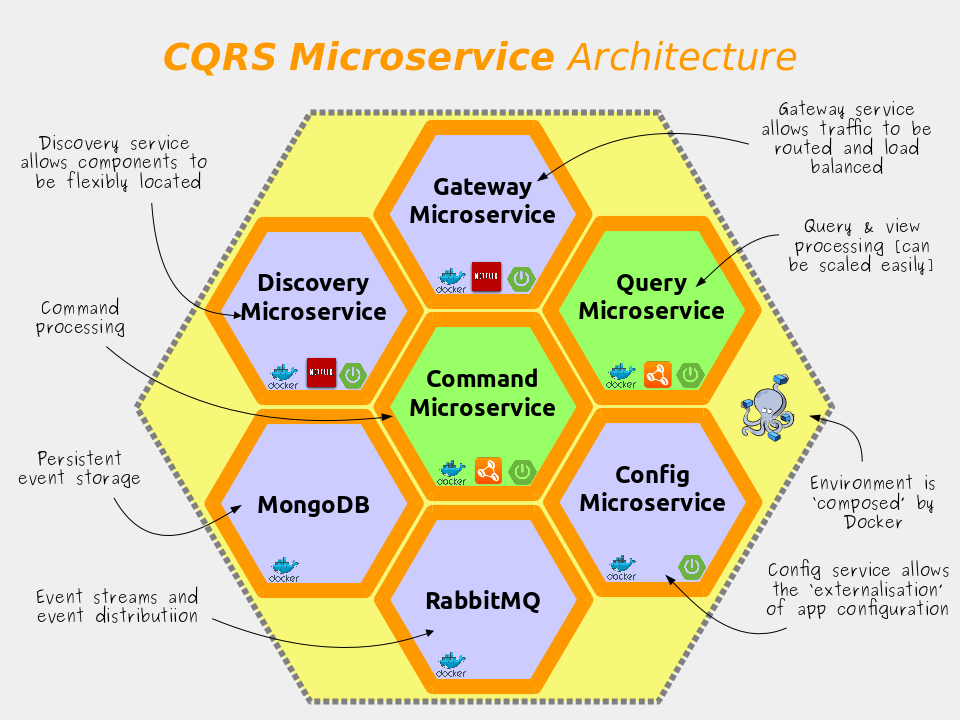
In order to do this I’ve used Docker to create a suite of containers containing all the microservices required to run the demo. At the time of writing there are seven microservices  in this suite; they are:-


The source code for this demo is available on Github and demonstrates how to implement and integrate several of the features required for ‘cloud native’ Java including:-

  • Microservices with Java and Spring Boot;
  • Build, Ship and Run anywhere using Docker containers;
  • Command and Query Responsibility Separation (CQRS) and Event Sourcing (ES) using the Axon Framework v2, MongoDB and RabbitMQ;
  • Centralised configuration, service registration and API Gateway using Spring Cloud;

How it works

The microservice sample project introduced here revolves around a fictitious `Product` master data application similar to that which you’d find in most retail or manufacturing companies. Products can be added, stored, searched and retrieved from this master  data using a simple RESTful service API. As changes happen, notifications are sent to interested parties using messaging.

The Product Data application is built using the CQRS architectural style. In CQRS commands like `ADD` are physically separated from queries like `VIEW (where id=1)`. Indeed in this particular example the Product domain’s codebase has been quite literally split into two separate components – a command-side microservice and a query-side microservice.

Like most 12 factor apps, each microservices has a single responsibility; features its own datastore; and can be deployed and scaled independently of the other. This is CQRS and microservices in their most literal interpretation. Neither CQRS or microservices have to be implemented in this way, but for the purpose of this demonstration I’ve chosen to create a very clear separation of the read and write concerns.

The logical architecture looks like this:-

CQRS Architecture Overview

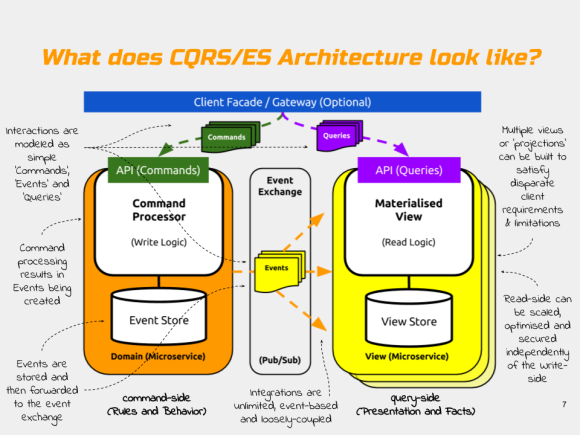
Both the command-side and the query-side microservices have been developed using the Spring Boot framework. All communication between the command and query microservices is purely `event-driven`. The events are passed between the microservice components using RabbitMQ messaging. Messaging provides a scalable means of passing events between processes, microservices, legacy systems and other parties in a loosely coupled fashion.

Notice how neither of the services shares it’s database with the other. This is important because of the high degree of autonomy it affords each service, which in turn helps the individual services to scale independently of the others in the system. For more on CQRS architecture, check out my Slideshare on CQRS Microservices which the slide above is taken from.

The high level of autonomy and isolation present in the CQRS architectural patterns presents us with an interesting problem – how should we distribute and run components that are so loosely coupled? In my view, containerisation provides the best mechanism and with Docker being so widely used, it’s format has become the defacto standard for container images, with most popular cloud platforms offering direct support. It’s also very easy to use, which definitely helps.

The Command-side Microservice

Commands are “actions which change state“. The command-side microservice contains all the domain logic and business rules. Commands are used to add new Products, or to change their state. The execution of these commands on a particular Product results in `Events` being generated which are persisted by the Axon framework into MongoDB and propagated out to other processes (as many processes as you like) via RabbitMQ messaging.

In event-sourcing, events are the sole record of state for the system. They are used by the system to describe and re-build the current state of any entity on demand (by replaying it’s past events one at a time until all previous events have been re-applied). This sounds slow, but actually because events are simple, it’s really fast and can be tuned further using rollups called ‘snapshots’.

In Domain Driven Design (DDD) the entity is often referred to as an `Aggregate` or an `AggregateRoot.`

The Query-side Microservice

The query-side microservice acts as an event-listener and a view. It listens for the `Events` being emitted by the command-side and processes them into whatever shape makes the most sense (for example a tabular view).

In this particular example, the query-side simply builds and maintains a ‘materialised view’ or ‘projection’ which holds the latest state of the individual Products (in terms of their id and their description and whether they are saleable or not). The query-side can be replicated many times for scalability and the messages held by the RabbitMQ queues can be made to be durable, so they can even temporarily store messages on behalf of the query-side if it goes down.

The command-side and the query-side both have REST API’s which can be used to access their capabilities.

For more information, see the Axon documentation which describes how Axon brings CQRS and Event Sourcing to your Java apps as well as lots of detail on how it’s configured and used.


Running the Demo

Running the demo code is easy, but you’ll need to have the following software installed on your machine first. For reference I’m using Ubuntu 16.04 as my OS, but I have also tested the app on the new Docker for Windows Beta successfully.

  • Docker (I’m using v1.8.2)
  • Docker-compose (I’m using v1.7.1)

If you have both of these, you can run the demo by following the process outlined below.

If you have either MongoDB or RabbitMQ already, please shut down those services before continuing in order to avoid port clashes.

Step 1: Get the Docker-compose configuration file

In a new empty folder, at the terminal execute the following command to download the latest docker-compose configuration file for this demo.

$ wget https://raw.githubusercontent.com/benwilcock/microservice-sampler/master/docker-compose.yml

Try not to change the file’s name – Docker defaults to looking for a file called ‘docker-compose.yml’. If you do change the name, use the -f switch in the following step.

Step 2: Start the Microservices

Because we’re using docker-compose, starting the microservices is now simply a case of executing the following command.

$ docker-compose up

You’ll see lots of downloading and logging output in the terminal window as the docker images are downloaded and run.

There are seven docker images in total, they are mongodb, rabbitmq, config-service, discovery-service, gateway-service, product-cmd-side, & product-qry-side.

If you want to see which docker instances are running (and also get their local IP address), open a separate terminal window and execute the following command:-

$ docker ps

Once the instances are up and running (this can take some time at first) you can have a look around immediately using your browser. You should be able to access:-

  1. The Rabbit Management Console on port `15672`
  2. The Eureka Discovery Server Console on port `8761`
  3. The Configuration Server mappings on port `8888`
  4. The API Gateway Routes on port ‘8080’

Step 3: Working with Products

So far so good. Now we want to test the addition of products.

In this manual system test we’ll issue an `add` command to the command-side REST API.

When the command-side has processed the command a ‘ProductAddedEvent‘ is raised, stored in MongoDB, and forwarded to the query-side via RabbitMQ. The query-side then processes this event and adds a record for the product to it’s materialised-view (actually a H2 in-memory database for this simple demo). Once the event has been processed we can use the query-side microservice to lookup information regarding the new product that’s been added. As you perform these tasks, you should observe some logging output in the docker-compose terminal window.

Step 3.1: Add A New Product

To perform test this we first need to open a second terminal window from where we can issue some CURL commands without stopping the docker composed instances we have running in the first window.

For the purposes of this test, we’ll add an MP3 product to our product catalogue with the name ‘Everything is Awesome’. To do this we can use the command-side REST API and issue it with a POST request as follows…

$ curl -X POST -v --header "Content-Type: application/json" --header "Accept: */*" "http://localhost:8080/commands/products/add/01?name=Everything%20Is%20Awesome"

If you don’t have ‘CURL’ available to you, you can use your favourite REST API testing tool (e.g. Postman, SoapUI, RESTeasy, etc).

If you’re using the public beta of Docker for Mac or Windows (highly recommended), you will need to swap ‘localhost’ for the IP address shown when you ran docker ps at the terminal window.

You should see something similar to the following response.

* Trying 127.0.0.1...
* Connected to localhost (127.0.0.1) port 8080(#0)
> POST /commands/products/add/01?name=Everything%20Is%20Awesome HTTP/1.1
> Host: localhost:9000
> User-Agent: curl/7.47.0
> Content-Type: application/json
> Accept: */*$ http://localhost:8080/commands/products/01
< HTTP/1.1 201 Created
< Date: Thu, 02 Jun 2016 13:37:07 GMTThis
< X-Application-Context: product-command-side:9000
< Content-Length: 0
< Server: Jetty(9.2.16.v20160414)

The response code should be `HTTP/1.1 201 Created.` This means that the MP3 product “Everything is Awesome” has been added to the command-side event-sourced repository successfully.

Step 3.2: Query for the new Product

Now lets check that we can view the product that we just added. To do this we issue a simple ‘GET’ request.

$ curl http://localhost:8080/queries/products/1

You should see the following output. This shows that the query-side microservice has a record for our newly added MP3 product. The product is listed as non-saleable (saleable = false).

{
  name: "Everything Is Awesome",
  saleable: false,
  _links: {
    self: {
    href: "http://localhost:8080/queries/products/1"
    },
  product: {
    href: "http://localhost:8080/queries/products/1"
    }
  }
}

That’s it! Go ahead and repeat the test to add some more products if you like, just be careful not to try to reuse the same product ID when you POST or you’ll see an error.

If you’re familiar with MongoDB you can inspect the database to see all the events that you’ve created. Similarly if you know your way around the RabbitMQ Management Console you can see the messages as they flow between the command-side and query-side microservices.

About the Author

Ben Wilcock is a freelance Software Architect and Tech Lead with a passion for microservices, cloud and mobile applications. Ben has helped several FTSE 100 companies become more responsive, innovate, and agile. Ben is also a respected technology blogger who’s articles have featured in Java Code Geeks, InfoQ, Android Weekly and more. You can contact him on LinkedIn, Twitter and Github.

Categories
android java

Event Tracking with Analytics API v4 for Android

As I’ve learned from developing my own mileage tracking app for cyclists and commuters, getting ratings and feedback from users can be challenging and time consuming. Event tracking can help by enabling you to develop a sense of how popular a particular feature is and how often it’s getting used by users of your app.

In Android, Google Play Services’ Analytics API v4 can be used to gather statistics on the user-events that occur within your app.  In this post I’ll quickly show you how to use this API to accomplish simple event tracking.

Getting started.

It’s important to say at this point that all of these statistics are totally anonymous. App developers who use analytics have no idea who is using each feature or generating each event, only that an event occurred.

Assuming you’ve set up Google Analytics v4 in your app as per my last post, tracking app events is fairly simple. The first thing you need is your analytics application Tracker (obtained in my case by calling getApplication() as per the previous post). Bear in mind that this method is only available in an object that extends Android’s Activity or Service class so you can’t use it everywhere without some messing about.

Once you have your application Tracker you should use an analytics EventBuilder to build() an event and use the send() method on the Tracker to send it to Google. Building an event is easy. You simply create a new HitBuilders.EventBuilder, setting a ‘category’ and an ‘action’ for your new event.

Sample code.

The sample code below shows how I track the users manual use use of the ‘START’ button in Trip Computer. I have similar tracking events for STOP and also for the use of key settings and features like the activation of the app’s unique ‘battery-saver’ mode (which I understand is quite popular with cyclists).

// Get an Analytics Event tracker.
Tracker myTracker = ((TripComputerApplication) getApplication())
.getTracker(TripComputerApplication.TrackerName.APP_TRACKER);

// Build and Send the Analytics Event.
myTracker.send(new HitBuilders.EventBuilder()
.setCategory(&quot;Journey Events&quot;)
.setAction(&quot;Pressed Start Button&quot;)
.build());

Once the events are reported back to Google, the Analytics console will display them in the ‘Behaviour > Events > Overview’ panel and display a simple count how many times each event was raised within the tracking period. You can also further subdivide the actions by setting a ‘label’ or by providing a ‘value’ (but neither of these is actually required).

More information.

For more information see the following articles:-

https://support.google.com/analytics/answer/1033068?hl=en
https://developers.google.com/analytics/devguides/collection/gajs/eventTrackerGuide#Anatomy

About the Author

Ben Wilcock is the developer of Trip Computer, the only distance tracking app for Android with a battery-saving LOW POWER mode. It’s perfect for cyclists, runners, walkers, hand-gliders, pilots and drivers. It’s free! Download it from the Google Play Store now:-

Get Trip Computer on Google Play

Categories
android architecture java

Working with Google Analytics API v4 for Android

For v4 of the Google Analytics API for Android, Google has moved the implementation into Google Play Services. As part of the move the EasyTracker class has been removed, but it still possible to get a fairly simple ‘automatic’ Tracker up and running with little effort. In this post I’ll show you how.

Assumptions:
  • You’re already using the Google Analytics v3 API EasyTracker class and just want to do a basic migration to v4 – or –
  • You just want to set up a basic analytics Tracker that sends a Hit when the user starts an activity
  • You already have the latest Google Play Services up and running in your Android app

Let’s get started.

Because you already have the Google Play Services library in your build, all the necessary helper classes will already be available to your code (if not see here). In the v4 Google Analytics API has a number of helper classes and configuration options which can make getting up and running fairly straight forwards, but I found the documentation to be a little unclear, so here’s what to do…

Step 1.

Create the following global_tracker.xml config file and add it to your android application’s res/xml folder. This will be used by GoogleAnalytics class as it’s basic global config. You’ll need to customise screen names for your app. Note that there is no ‘Tracking ID’ in this file – that comes later. Of note here is the ga_dryRun element which is used to switch on or off the sending of tracking reports to Google Analytics. You can use this setting in debug to prevent live and debug data getting mixed up.

<?xml version="1.0" encoding="utf-8"?>
<resources xmlns:tools="http://schemas.android.com/tools" tools:ignore="TypographyDashes">

<!-- the Local LogLevel for Analytics -->
<string name="ga_logLevel">verbose</string>

<!-- how often the dispatcher should fire -->
<integer name="ga_dispatchPeriod">30</integer>

<!-- Treat events as test events and don't send to google -->
<bool name="ga_dryRun">false</bool>

<!-- The screen names that will appear in reports -->
<string name="com.mycompany.MyActivity">My Activity</string>
</resources>

Step 2.

Now add a second file, “app_tracker.xml” to the same folder location (res/xml). There are a few things of note in this file. You should change the ga_trackingId to the Google Analytics Tracking Id for your app (you get this from the analytics console). Setting ga_autoActivityTracking to ‘true’ is important for this tutorial – this makes setting-up and sending tracking hits from your code much simpler. Finally, be sure to customise your screen names, add one for each activity where you’ll be adding tracking code.


Step 3.

Last in terms of config, modify your AndroidManifest.xml by adding the following line within the ‘application’ element. This configures the GoogleAnalytics class (a singleton whick controls the creation of Tracker instances) with the basic configuration in the res/xml/global_tracker.xml file.


<?xml version="1.0" encoding="utf-8"?>
<resources xmlns:tools="http://schemas.android.com/tools" tools:ignore="TypographyDashes">

<!-- The apps Analytics Tracking Id -->
<string name="ga_trackingId">UX-XXXXXXXX-X</string>

<!-- Percentage of events to include in reports -->
<string name="ga_sampleFrequency">100.0</string>

<!-- Enable automatic Activity measurement -->
<bool name="ga_autoActivityTracking">true</bool>

<!-- catch and report uncaught exceptions from the app -->
<bool name="ga_reportUncaughtExceptions">true</bool>

<!-- How long a session exists before giving up -->
<integer name="ga_sessionTimeout">-1</integer>

<!-- If ga_autoActivityTracking is enabled, an alternate screen name can be specified to substitute for the full length canonical Activity name in screen view hit. In order to specify an alternate screen name use an <screenName> element, with the name attribute specifying the canonical name, and the value the alias to use instead. -->
<screenName name="com.mycompany.MyActivity">My Activity</screenName>
</resources>

That’s all the basic xml configuration done.

Step 4.

We can now add (or modify) your application’s ‘Application’ class so it contains some Trackers that we can reference from our activity…


package com.mycompany;

import android.app.Application;

import com.google.android.gms.analytics.GoogleAnalytics;
import com.google.android.gms.analytics.Tracker;

import java.util.HashMap;

public class MyApplication extends Application {

// The following line should be changed to include the correct property id.
private static final String PROPERTY_ID = "UX-XXXXXXXX-X";

//Logging TAG
private static final String TAG = "MyApp";

public static int GENERAL_TRACKER = 0;

public enum TrackerName {
APP_TRACKER, // Tracker used only in this app.
GLOBAL_TRACKER, // Tracker used by all the apps from a company. eg: roll-up tracking.
ECOMMERCE_TRACKER, // Tracker used by all ecommerce transactions from a company.
}

HashMap<TrackerName, Tracker> mTrackers = new HashMap<TrackerName, Tracker>();

public MyApplication() {
super();
}

synchronized Tracker getTracker(TrackerName trackerId) {
if (!mTrackers.containsKey(trackerId)) {

GoogleAnalytics analytics = GoogleAnalytics.getInstance(this);
Tracker t = (trackerId == TrackerName.APP_TRACKER) ? analytics.newTracker(R.xml.app_tracker)
: (trackerId == TrackerName.GLOBAL_TRACKER) ? analytics.newTracker(PROPERTY_ID)
: analytics.newTracker(R.xml.ecommerce_tracker);
mTrackers.put(trackerId, t);

}
return mTrackers.get(trackerId);
}
}

Either ignore the ECOMMERCE_TRACKER or create an xml file in res/xml called ecommerce_tracker.xml to configure it. I’ve left it in the code just to show its possible to have additional trackers besides APP and GLOBAL. There is a sample xml configuration file for the ecommerce_tracker in <your-android-sdk-directory>\extras\google\google_play_services\samples\analytics\res\xml but it simply contains the tracking_id property discussed earlier.

Step 5.

At last we can now add some actual hit tracking code to our activity. First, import the class com.google.android.gms.analytics.GoogleAnalytics and initialise the application level tracker in your activities onCreate() method. Do this in each activity you want to track.


//Get a Tracker (should auto-report)
((MyApplication) getApplication()).getTracker(MyApplication.TrackerName.APP_TRACKER);

Then, in onStart() record a user start ‘hit’ with analytics when the activity starts up. Do this in each activity you want to track.


//Get an Analytics tracker to report app starts and uncaught exceptions etc.
GoogleAnalytics.getInstance(this).reportActivityStart(this);

Finally, record the end of the users activity by sending a stop hit to analytics during the onStop() method of our Activity. Do this in each activity you want to track.


//Stop the analytics tracking
GoogleAnalytics.getInstance(this).reportActivityStop(this);

And Finally…

If you now compile and install your app on your device and start it up, assuming you set ga_logLevel to verbose and ga_dryRun to false, in logCat you should see some of the following log lines confirming your hits being sent to Google Analytics.


com.mycompany.myapp V/GAV3? Thread[GAThread,5,main]: connecting to Analytics service
com.mycompany.myapp V/GAV3? Thread[GAThread,5,main]: connect: bindService returned false for Intent { act=com.google.android.gms.analytics.service.START cmp=com.google.android.gms/.analytics.service.AnalyticsService (has extras) }
com.mycompany.myapp V/GAV3? Thread[GAThread,5,main]: Loaded clientId
com.mycompany.myapp I/GAV3? Thread[GAThread,5,main]: No campaign data found.
com.mycompany.myapp V/GAV3? Thread[GAThread,5,main]: Initialized GA Thread
com.mycompany.myapp V/GAV3? Thread[GAThread,5,main]: putHit called
...
com.mycompany.myapp V/GAV3? Thread[GAThread,5,main]: Dispatch running...
com.mycompany.myapp V/GAV3? Thread[GAThread,5,main]: sent 1 of 1 hits

Even better, if you’re logged into the Google Analytics console’s reporting dashboard, on the ‘Real Time – Overview’ page, you may even notice the following…

Real Time Overview page
Analytics Real Time Overview page

Next time…

In my next post I’ll show you how to use event tracking to gain extra feedback your users.

About the Author

Ben Wilcock is author of Trip Computer, the only distance tracking app for Android with a LOW POWER mode. It’s perfect for cyclists, runners, walkers, hand-gliders, pilots and drivers. It’s free! Download it from the Google Play Store now:-

Get Trip Computer on Google Play

Categories
android java

Announcing: Trip Computer for Android

The reason that I’ve been so bad a posting recently is that I caught the Android development bug. I’ve been using all my spare time working on a new Android application called ‘Trip Computer’.

Trip Computer is a cost and distance tracker that you can use to help with business mileage expenses, or for leisure any time you want to know how far you’ve travelled, which direction you’ve been going in or how long you’ve been going. You can use it walking, cycling, running, in the car, on the train or even on boats or planes (subject to the usual flight restrictions).

TripComputer-app-framed-shadow

Working with Android has been the most brilliant experience, it really is very cool. I’ve also been exclusively using the new Android Studio IDE from Google (pre-beta) including it’s built in Gradle build system.

Android Studio is really good. Announced at last years Google I/O conference it’s based on IntelliJ Idea Community Edition and already it’s giving Eclipse a real run for its money with its strong integration into the Android eco-system. The learning curve has been quite forgiving and the IDE quality and stability are very surprising considering its not a fully released product.

Gradle is a different story. I can take it or leave it to be honest. As a Maven user, I can see lots of issues and nasty cludges (like the poor file ‘filter’ and replace experience which is really useful and much better in Maven). The learning curve has been steep, possibly because Android projects are not standard Java projects. But no pain no gain as they say and I do feel like I’ve come out the other side stronger and more flexible as a result.

I did pick up some handy Android hints and tips along the way, which no doubt I’ll share when I get more time.

You can download the full app for free and try it out for yourself. It’s fairly simple in UI / UX terms, but hopefully it’s got enough features to be a fun addition you your phone or tablet. I’ve tried to support the widest range of devices possible so anything with Froyo onwards and the right hardware should be just fine…

Get it on Google Play

Categories
architecture java SOA web services

Implementing Entity Services using NoSQL – Part 1: Outline

Over the past few weeks I’ve been doing some R&D into the advantages of using NoSQL databases to implement Entity services (also known as Data Services).

Entity service is a classification of service coined in the Service Technology series of books from Thomas Erl. It’s used to describe services that are highly agnostic and reusable because they deal primarily with the persistence of information modelled as business data ‘entities’. The ultimate benefit of having thin layer of these entity services is in the ease at which you can re-use them to support more complex service compositions.

This approach is further described in the Entity Abstraction SOA pattern.

Entity service layers are therefore a popular architectural choice in SOA, and implementing them has meant big business for vendors like Oracle and IBM, both of whom offer software to support this very task. There is even a separate standard for technologies in this area called Service Data Objects (or SDO for short).

This is all well and good, but these applications come with dedicated servers and specialised IDE’s and its all a bit ‘heavyweight’. These specialised solutions can be terribly expensive if all you really want are some simple CRUD-F operations (Create, Read, Update, Delete, Find) on a service that manages the persistence of a simple canonical data type like a Product or a Customer.